Since I made the purse gift box a while back I have had several requests for the pattern.
Well the pattern isn't mine, I learned from Randi, and if you understand metric you could do no better than follow Randi's wonderful instructions here.
However, if you're like me, you're an "inches" girl. So of course it was only a matter of time before I "improvised" and created a pattern which looks very much like Randi's only I use inches. In actual fact, the box comes out about an inch larger than Rand's original, but it seemed the only way to do it and still make the measurements reasonable to us "inchies".
OK!
So start off with a sheet of cardstock 8x12 inches .
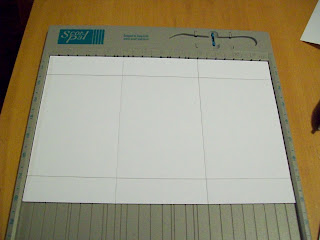
With your paper "landscape" across your scorpal, score the sheet into three columns, (so score at 4 inches and 8 inches.)
Now, turn the paper "portrait" and score down the sides at 1 1/4 inches on either side. So that when you turn the paper back to it's "landscape" position it would look like this below:
OK?
Now look at the picture below.
You're going to make a mark at 2 3/4 inches down the inner line.
Do this on both sides and at both ends.
Now, using a ruler, draw a line from those dots to the outer edges of the paper like so:
So, see you have these two squares now, right?
Now you want to draw a line from the middle of that square to the vertice there inside, see what I mean in the picture below:
(If you want to be exact, measure 7/8 inch to get to the middle of that line, but this really isn't critical, so I just eyeball it.)
See the triangles you now have?
Now we're going to cut across the line you see below and snip out that inner triangle.
It will look like this:
Do the same for both ends of the paper. (See below).
vvvvvvvvvvvvvvvvvvvvvvvvvvvvvvvvvvvvvvvvvvvvvvvvvvvvvvvvvvvvvvvvvvv
OK!
Now we're going to do the gables.
Hold your paper "portrait".
If you look close you can see the measurements I've written on the paper below. You will measure 2 inches in from the score line on the left and also 2 inches in from the score line on the right. Make two dots.
Now, draw a line from these two dots to the two corners of the triangles that you just snipped out, ok?
It will look like the gable of a house.
Then we snip out the bits that aren't in the "gable". See below.
Are you following me?
We need to repeat for the other end of the paper, so it matches.
Cut out.
Now rub over your score lines to make them all crisp.
Your box will begin to take shape.
Now score tape (or use whatever strong adhesive you like) the corners and affix.
It will look like a house without a roof.
Now we need to measure out two strips of cardstock. The first is:
11 x 4 inches.
Holding it "landscape", score the first "panel" at 1 1/4 inches wide, the next panel at 3 1/2 inches,
then 1 1/2 inches, 3 1/2 inches and the last panel should be 1 1/4 inches wide.
The skinnier panel underneath is the "bridge" and that measures 1 1/2 x 8. You will score 2 inches in at both ends.
vvvvvvvvvvvvvvvvvvvvvvvvvvvvvvvvvvvvvvvvvvvvvvvvvvvvvvvvvvvv
So here are the pieces below:
The narrow panel lays across the top and inside of the "house like a rafter. Scortape that in. Just match your score lines to the flat edge of the roof.
Now check that when you lay your wide panel on top of the "rafter" that the measurements all look accurate.
You will also cut a piece of cardstock 11x 1 for the purse handle.
Now decorate the panels.
For the sides of the purse, simply turn your purse on its side and trace the pattern onto a sheet of designer paper and then cut the shapes out. Trim to have a bit of a border or mat.
I am using Coredinations cardstock for the matting and DCWV glittery decorative paper everything else.You can see the finished panels below:
Now we need to make a hole on either side of the purse so you can reach in. I am using my Spellbinders Nestabilities for this.
And because I want a bit of a frame for my circles I am using a scalloped nestie on the dark pink cardstock.
First cut out the scalloped circle below (using the cuttlebug)
And then lay the solid circle on top of the cut out scalloped circle and cut again, leaving you with two scalloped rings.
Paste onto the panel.
Once you've affixed the long panel at the "roof", you can either tape down the sides of the panel at the bases or use small magnet closures so that you can lift up the sides when you want to.
Fully assembled below:
And for those of you who say, "I don't know what I would use something like this for!"
Uh hello????
OK, I hope this works out for you. If you have any questions or I'm just not being clear or I forgot to mention a measurement, please tell me so I can fix it or elaborate. :-)


.jpg)


12 comments:
Fantastic instuctions Dorcas, Your's is just gorgeous. I would love to make one for a friends Birthday tomorrow, I am taking her flowers, but how nice to take her one of these bags too. I will see if I have time to make one, great measurments especially for us "Inchies"!!
Ta.
Debbiexx
This is gorgeous. Great tutorial. Thank you for sharing.
wonderful tutorial. thanks, Dorcas!
great tutorial! thanks for sharing. This will be on my inspiration blog post tomorrow.
Oh you did a fantastic job creating this inches tut. thanks so much
Wow, thank you for all the effort and time you put in this! Sometimes I like to use cm, sometimes inch ... depends on either the tutorial or my mood...
Hello!
This is so great! Thank you for the tutorial!
Wishing you a wonderful weekend!
Hugs,
Barbara Diane
I found your wonderful tutorial here: http://www.paperpunchaddiction.com/2011/02/punch-inspiration-22411.html
The purse box is so sweet and makes me smile when I can see how to make it! You have explained your tutorial so simply that everyone, anyone could follow it, even me.
Th♥nks for sharing! I can't wait to do this project!
sending lovely greetings from Germany
Regina
Good job! I follow! I think... I definitely get put the candy in the box thing! lol!
Hi Doracas,
Thanks so much for converting this tutorial to "Inches"! Like you, I am also an 'inches' girl and get totally lost with Centimeters!!
You made this look easy to follow and I hope to try it very soon!
Your box came out wonderful..Love it!
Thanks again,
Lisa
omg! this is the best tutorial! so easy to follow that someone like me (not very good at boxes!) can follow! thanks so much for sharing...so glad i hopped over from catered crop! hugs!
Wow, wonderful directions, yours came out beautiful! Thanks for sharing!
Post a Comment