Hi Guys!
So today I'd like to share something different with you all.
I've been itching to do a Colored Pencil Portrait (ambitious, I know) for some time and for those of you who might be similarly inclined I learned a few tricks online.
I say "tricks" but there's nothing sneaky about what we're going to do. Artists have been tracing, or 'projecting' the subject they want to paint onto a surface for decades.
I could sketch my subject but it would just take a lot longer so I'm skipping a step. And I'm going to show how to do it too.
First of all, I am using Paint.Net (a free photo manipulating software similar to photoshop)
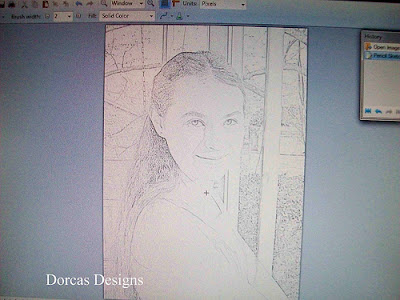
So after you've downloaded Paint, open it up. It will look like this:
Click on FILE in the upper left hand corner, then OPEN to retrieve your photo from a folder.
A box will pop up which will allow you to fumble around for your picture.
When you find it, select it and click OPEN at the bottom right.
See below:
Now your photo will appear on your Paint screen.
Next, click on EFFECTS located in the bar at the top of the window.
Then, in the pop up box, select ARTISTIC and
then PENCIL SKETCH.
You're going to have a box come up right smack dab in the middle of your picture.
This box allows you to manipulate the size of the "pencil" strokes so you can make your sketch as light or as heavy as you like.
Click OK
Here's the finished sketch below. Amazing, isn't it?
Now don't forget to save your sketch by going back to FILE in the upper left corner. Selecting SAVE AS.
This is so you can keep your sketch somewhere safe on your computer and retrieve it again.
So I have my finished sketch on file and so I printed it out onto some proper drawing paper.
I also printed out an original photo, as well as a photo covered in a grid and a sketch covered in a grid. I don't know if I'll need the latter two but I figured I'd cover all bases just to be on the safe side. :-)
So there's the easy bit done. Now I have the challenging job of making this sketch come alive. I'm a bit nervous if I'm being honest but there's a quote I read from one of you crafter's blogs that said "whether you think you can do it or whether you think you can't, in either case you're right."
So I'm going to try. :-)
It will take some time but I promise to show you all how it comes out.
*In passing, there's a technicality you might want to know.
When you make use a sketch printed out like this to do a colored pencil painting you are not allowed to enter it into an art show under "Colored Pencil Painting". It would have to be labeled as "Mixed Media" because of the print ink.
However, if you really wanted to be "artistically correct" you can remedy this by simply taking your printed out sketch and transferring it onto your sketch paper with a graphite sheet of transfer paper. You would have to trace it, but the marks would be graphite and so "pencil".
I'm not planning on winning any blue ribbons so I'm happy with this but its good to know.
Happy Crafting!


.jpg)


13 comments:
Very interesting - thanks!
awesome...thanks for sharing..
What a fun project! And if any one can pull it off, it's you! I have not seen anyone out there who is nearly as amazing as you are with your pencils!
Wow!! Dorcas...this is amazing. I can't wait to see how you finish it. I love just the black and white one too. May just have to try this for a Christmas present?? I am not a talented artist like you. I just pretend but am getting better. Thanks Hun.
thank you for the tutorial! can't wait to see how you colored it!! =)
Amazing, looks like a lot of fun, I need to try. Hugs, Lori m
Ooh, I am going to have to see if I can do this with PSE 9 - although for me half the fun is sketching it by hand (yeah I know - show off) But it's one of the few things I can do!!
Hugs
Jane
Thanks for the tip on Paint. I'm using a different computer and it does not have my Adobe Photoshop so I am going to download Paint. TX again Dorcas.
That's a neat idea for a pencil "sketch" ;) Now what will you do with it? Do you plan to color it in? If so I'm looking forward to seeing that. I had that quote in my "First Self-Portrait" post about a week or two ago. That might be where you saw that, but in any case, I believe it's true and should be shared with others. :) "I think I can, I think i can!" heeehee.
Hey guess what? I tried my very first Prisma-colored digi on Kraft cardstock today!! I don't have it made into a card yet, but I used your tutorial and am pretty happy with the results. I really need a good quality pencil sharpener now though as my black outlining at the end is a bit thick.
One of my daughter's today was getting irritated with her younger sister because she was trying everything that the other one was doing in the craft room. I told her, "you know, when someone copies you, it's the best form of flattery... meaning she loves your talent and wants to be as good as you!" And when I see your work and want to try your techniques, that's what it is... a compliment and I hope to get my skill level up to yours! *Ü* Practice, practice, practice!! LOL.
Thanks for all your wonderful tutorials and fabby inspiration Dorcas!
This is awesome! I know it is coming out great! I had not seenthis post yet when you were talking about it the other day, so I was not sure what was going on. Now it makes sense, and I love the end results.
Thanks, I've been playing around with this. Looking forward to seeing yours coloured. Hugs lin
Snapstouch is free online tool to convert photo to sketch, photo to painting, photo to drawing, photo to outline, photo to B&W etc. This tool adds theses effect with maintaining actual size and that is totally free of cost even you don't need to create account to add the effects.
www.snapstouch.com
Thank-you for the link to Paint-net a great tool !!
Post a Comment