Hi Guys!
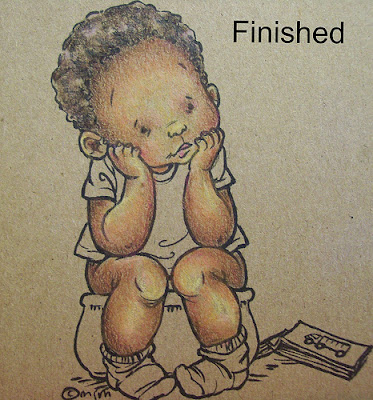
So as promised, I worked up a step by step for you in coloring ethnic skin tones on kraft.
I was a little more ' in my element ' doing this one and I hope you like it.
The colors are very similar to what you would use on white paper (see tutorial for white here) with this one difference: Because we are looking for a darker shade of skin there is no need to start off with whites and creams. In fact, this is where kraft is in its element because we're halfway there before we start. ;)
OK! So lets get started!
Step 1 we're going to work the shadows with light umber. Just nice easy circular strokes.
Follow the umber with (step 2) burnt ochre. So you're covering the light umber with the burnt ochre and coming in toward the center just a bit further.
Step 3) All over with goldenrod. (below)
He's looking a little jaundiced at this point but don't panic.
Step 4) working the shadows with sienna brown.
Step 5) begin blending with pink (very lightly) and add a wee bit of process red in the deepest shadows for "punch".
Steps 6&7)
ok, I know this looks like a lot but it isn't really.
The yellow ochre, jasmine and peach is a layering combo that works wonderfully to blend the tones together. If your image is too pinky peachy, add more yellow, if its too yellow, add more peach etc. You get the idea.
The dark brown is added in the shadows to re-depthen them. (They may have lost some depth with the blending).
It really starts coming alive now.
Step 8) This is just so exciting! Burnt Ochre and Dark Brown is used now for further contouring and depth.
This is where you get an inkling of what Geppetto felt when Pinocchio came to life.You know what I mean? It's like the image starts to breathe when your back is turned! lol
Step 9) The final magic touch: Black. Black grounds everything . It adds realism and the shadows darkest depths.
ps) I added the hair colors on the side in case you were wondering what I did.;)
And here he is all finished!
Really you could go in and tweak and tweak til the cows come home but at some point you've got to say "enough ".
It's a tough call.
But I think he's pretty cute as he is. :)
happy coloring!


.jpg)


17 comments:
Hi Dorcas. Where would you be without your Kraft nowadays? LOL. Fabulous image, beautifully coloured and a great tutorial for those using pencils.
Tine :)
wowww you are amazing
This is STUNNING, Dorcas. (Do I say that everytime?) But truly - I really did watch this little guy come to life and he's gorgeous. Problem is - I don't use pencils so please can we have one in Copics (tee hee). Thank you so much for sharing. Hugs, Lesley
*jaw drops* You are, without a doubt, the best colourist with Prismacolor pencils... Absolutely STUNNING.
Fabulous!
Perfect! You've just brought him to life. :-)
Perfect!! I´d never be able to color that way.
OHHHHH, how cute is he!!! Really love this one!! Stunning coloring!!! Enjoy your day, Colinda
Your coloring is amazing, it`s a great joy to see your work.
Hugs Gretha
Another tutorial to bookmark - cheers hun!!
P.S. You do know you're awesome at this don't you!!!
Hugs
Jane
Thanks for another fantastic coloring tutorial, Dorcas!
Hes amazing Dorcas and only you could do this so well my freind, just beautifu l thanks for the tutorial huggies June xxxxxxxx
I don't know what to say, this is so amazing how beautifully you do the coloring and the patience to make tutorial.
Thank you so much. :)
Wow!! This is just stunning Dorcas! Such amazing colouring..I love the depth and the detail :)
No question in my mind...YOU are the MASTER w/colored pencils! Thanks so much for doing this research...and tutorial. You are amaaaaaazing! Hugs. pat Frank
Wow your work is amazing, thank you for this tutorial, and thank you for following , it led me to you amd I am now your 840 follower.
Fabulous work Dorcas well done Hugs Elaine
Hello!
You are so skilled at coloring on the kraft paper! Beautifully done! It would be great fun to take a class with you! Wishing you a happy Sunday!
Hugs,
Barbara Diane
Post a Comment