


Hi Guys!
Well its time to HOP TO IT!
That's right, its a new hop at Pumpkin Spice and if you came to me from lovely Lezlye you're right on track! If you get lost, head on back to Pumpkin Spice.
From here you're going to hop to sweet June's blog but before you go running off you have to look at my card, its part of business. lol
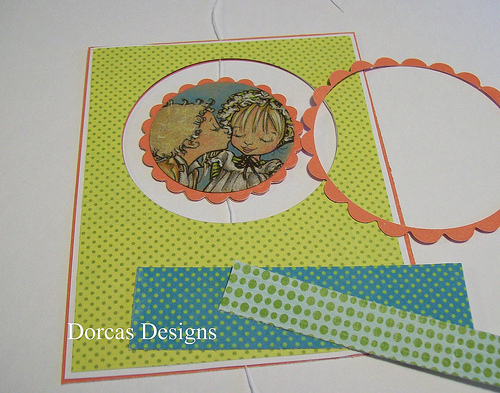
As you can see I made a spinner easel card for the hop and if you've never done one before I made a step by step tutorial which you can find below. I apologize in advance for the picture heavy post!

My recipe:
Image: Mo Manning
Colors: Lyra Rembrant and Prismacolor pencils
Paper: MME Happier
Buttons: from stash
OK! Tutorial time!
~Spinner Easel~
Below you have the basic things you'll need:
Scoring board
paper pack
scortape or other strong adhesive
1 12x12 cardstock (which you'll cut into the following sizes)
(1) 4x8 cardstock, scored at 2" and 4" when laid landscape down
(2) 4"x5" cardstock
(2) scalloped circles to frame your image and one larger scallop ring (explained later) to frame your window.
Spellbinder's Plain circle dies in 2" and 3"
Spellbinder's Scalloped Circle dies in 21/4" 31/4"
dental floss
To start with, crease your scored lines on your long panel.

Now we're going to put all the pieces to one side and work on our spinning panel.
So grab your (2) 4"x5" cardstock pieces and stack them together.
Run your 3"inch plain circle die through your die cutting machine with the circle placed in the upper half of the rectangle. (run it through 5 or 6 times to make sure it has cut through both layers of cardstock.)
Now both panels will line up perfectly. This is important.

Next cut your image out using your 2" plain circle die and then find some scrap cardstock and also cut out two frames for your image using your 2 1/4 inch scalloped die.
Stick your image onto one frame (below)

Now lay your second frame down and place a strip of dental floss across it. (top to bottom)
Fasten securely with scortape.
Peel paper off tape. Lay image onto base. (make sure you line up your scallops)

Place image into "window" with floss laying out across base.
This is the bottom layer.

Now you can lay the top layer over the base to see how it will look.
Don't secure the top layer yet, we still have more to do.

OK, now get a sheet of decorative paper. I like to have margin for error so get one that's a good size and cut out a circle in the same size as your window. (3")

See how my decorative paper is larger than my base?

Now line up your windows on the cardstock and your decorative paper and turn over.
Trace the cardstock onto the decorative paper and trim to size.

Two matching panels.

Lay your decorative panel over your top panel and affix.
See how it will look?

Now cut a scalloped ring as a frame for your window using your 3" plain circle and 31/4" scalloped circle.
Cut the scalloped circle first and then lay the plain circle die inside and run through your die cutting machine.

And also gather any paper pieces you might like to use to decorate your panel.
Glue your scalloped frame down and if you're going to do any sewing on your panel, now is the time to do it before you sandwich the two layers together. (so your seams wont be exposed)

Get out the trusty scortape and securely tape the two panels together.

OK, now onto the base.
Fold the base as seen, adhere scortape to the folded area seen below. (this is where you are going to stick down your decorative spinning panel.
Decorate the base however you like.

Now stick down your spinning panel and lay some chunky buttons (or something similar)
to anchor the easel.
There is a balance issue with the spinning easels, they're top heavy because they're taller than a traditional easel (allowing for the window) so you'll need to play around with the placement of the buttons to find a location that will hold the card in place.
That's it!
Remember, the next stop in the hop is June's blog.
Have fun crafting!


.jpg)


37 comments:
great looking card dorcas, thank you for the tutorial.
greetings karin
Adorable! Love the papers! Thanks for the tutorial! You know I have not made a spinner card yet? Now I know how!
Great tutorial Dorcas and as always another fabulous card!
Hugs
Jane
Your card is great!
Thank you for the tutorial!
Hugs Gisela
Dorcas this is stunning, beautiful creation and colouring, thanks for the tute. Joey x
Very cute card- great tutorial- TFS! :)Amy
Fantastic card. I've never done a spinner either. I also love the inspiration to make a card using just the faces. I don't know why I never think about doing that, but will do so now. Hugs, dj
wow Dorcas, this is lovely!
xxxxxxxxxxxxxx Amelia (mimi)
Great card Dorcas, thanks for the tutorial, I'll have to give it a try, never done a spinner card before. I just used this image - the whole thing tho, for an anniversary card for my daughter & son in law.
Bye for now,
Luv, Babs xo
WOW!!! What a great tutorial!! :) I love that card, its so pretty and fun!
Beautiful Love the coloring on the couple.
WOW! This is great- thanks for the tutorial! lclass003atgmaildotcom
Lovely! Loving that green polka dot!
Hi Dorcas. I've not made one a spinner in simply ages. Great card & fab tut too!
Tine :)
Oh I am going to try the spinning for sure.
Hugs tammy
AWESOME Dorcas! This is so fun.
Awesome spinner card, I just love those buttons :)
Cute card-thanks for the tutorial!
Sherrie K
http://sherriescraps.blogspot.com
Hi hun
wow a fabulous card, luv the colour combo,lovely image & colour work, brill tutorial thank you much, sue,x
Dorcas, this is a great tutorial! Thank you do much for sharing. You card is beautiful! ~Hugs, Saundra
Super Cute Card... Fantastic tutorial Dorcas.
Hugs,
fabulous spinner card, Dorcas! thanks for the tutorial, too. love it! hope you have a lovely weekend! =)
WOW! A spinner card AND a tute! Fun, fun! Never made one of these. This is totally Dorcas colors and style. Love it! Hugs!
Fabulous card, this is the first time I've seen this style. Thank you for the tutorial on it.
Lori m
tiredlady47@yahoo.com
So cute! What a great tutorial! Love the buttons!
Nice tutorial! I'll show you my 1st spinner, when I get to it!
Love, Laura
Its stunning me darling thanks for the tut xxxxx
Its stunning me darling thanks for the tut xxxxx
What a very nice card.
Thanks for taking the time to show us how to do this sweet car.
marg0006@verizon.net
Excellent spinner easel, Dorcas! I adore your sweet happy paper choices. I love an easy-to-follow tutorial too. Fab post, my friend :)
This is so cool Dorcas. I love it!
How is it that your card always leave a big smile on my face?!?!
Thanks for the fabulous tutorial!!
Hugs, Uli
I've been working and not crafting, Dorcas, and haven't had time to come by but I see you have been making delightful creations as usual. Love your recipe card!
This spinner card is so sweet and a great tutorial too. I started colouring up this little cutie from Mo last week. I think I'll go back and finish it off! Hugs, Lesley
This is truly amazing and the detailed tutorial is wonderful. Love how you explain things. The image is gorgeous to a fault. Love it.
Look at you! A clever little easel card...and a tutorial! I love it!! I made one of these years ago at a Stampin' Up party! Thanks so much for jarring my memory...I may have to make one of these soon...they're fun!! Love the image you chose...gorgeous, as always! Hugs. Pat Frank
What a brilliant tutorial. I love this. xxx
Post a Comment