Hi Guys!
Well I'm only just learning myself but a few of you have asked for some tips on coloring with Kraft and I said I would share what I know thus far. I'm sure there's as many ways to do it as there are crafters but this is my way and I hope it can help someone else.
To begin with Kraft is a rough toothed paper. So you will find you can add more layers of pencil lead than ordinary cardstock allows. This gives the effect of using pastels or chalks.I also use a firmer pressure than I normally would ,so this results in more pigment being put down.
I do not blend with any solution. I simply use my pencil pigment to blend.
You'll see.
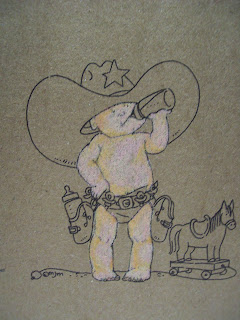
Below you find Baby Tex in all his naked glory. (a mo manning image.)
I have given him an all over color in Cream.
I have given him an all over color in Cream.
(I will be using Prismacolors)
He looks kind of like that African tribe that smears themselves in white clay at this point. lol
Don't worry, he'll improve.
Picture 2:
Light peach
Picture 3:(below)
Jasmine
He's looking a little scary right now but bear with me, ok?
Picture 4:(below)
Beige
Picture 5: (below)
blush pink
he's starting to look a little more human now, but still has a ways to go yet...
Picture 6: (below)
Peach
Picture 7: (below)
yellow ochre
now, I need to say that from this point forward I am only using the new colors in some areas of the baby. Not an overall coating. This is where your shading skills come in. You add the next few colors in your shadows because the colors we're using now are beoming progressively darker. ok?
Picture 8: (below)
mineral orange
he's really coming alive now isn't he?
Picture 9: (below)
Pink
Picture 10: (below)
Black
I can hear you say "What the......."
the black is to go over the lines that have become a little covered over. :-)
See? Looks good, right?
Now we'll start on the hat. I am using here:
Burnt ochre
Now fill in the center with beige and add some terracotta to darken a bit of the brim.
Go back in with the brown ochre to soften the edges and merge the colors.
Use the same colors for the holsters.
(below)
Now use some lemon yellow for the star as well as sunburst yellow for darkening your shadows.
The blue you're beginning to see is mediterreanean (sp?) blue and cloud blue
also some white.
For shading your white (the horse and diaper) use white, french gray 70%, 30% and black
Looking at the ground in the picture (above) you'll see I've put down some sepia to start with.
I've then added some beige. (below)
Then added some lime peel (below)
and darkened my shadows with Dark Umber.
To finish I used non photo blue to outline my image.
So now the little guy is ready to be put on a card.!


.jpg)


22 comments:
Thank you for creating this tutorial! I was wondering about your technique. I am going to have to give it a try.
oh wow great tutorial hun and so love that wee image just perfect hugs cheryl xxxxx
You are amazing <3 Hugs from Leeds, UK.
I watched you do this and I am still impressed. He really looks good. Now we will all be anxious to see where he lands! Some fabulous card I'm sure!
OK, I couln't possibly try your colouring because I'd NEVER BE able to mix colours like that. Darn.
Hugs
Annika
He's great, and a wonderfully detailed tutorial. thanks very much. Hugs lin
This is positively one of the best tutorials ever! I've just started playing with pencils and find them far more challenging than Copics. Thanks so much for sharing your expertise!
Nice tutorial!
Unfortunately I´m drawing like a 5-yr. old :-( I better stick to the camera...
But as Stacey said: we will all be anxious to see on which card he will land :-)
Dorcas, I've just started using Prismas. Thanks so much for sharing this tutorial! I cannot wait to try this technique! Your colouring is superb!
Fantastic tutorial Dorcas :) I just wanted to say Congrats on being chosen for the Sentimental Sundays DT & I'm looking forward to working with you.
Hope you're having a great weekend.
Hugs
Tracey
xx
Fabby Tutorial Dorcas! Congrats on the Sentimental Sundays DT & I'm looking forward to working with you chick!
hugz
Sal xx
This is such an amazing tutorial Dorcas. I am still a little concerned that I know have to invest in these Prismas that everyone is talking about. Not sure if mine will even come close to getting this effect. I will have to give it a go. This little guy is bust through my scrapbooking saloon anytime and show is sheriff's badge! Lol! He is gorgeous. Soon as I viewed my blogger list and saw is picture, I am saying, " Oh my goodness look what she has done this time! He is just gorgeous!" And that was before I even started to read your tutorial. Your colouring is amazing and I am floored to see that you have over 100 followers. Now what am I doing wrong I wonder? Not participating in enough challenges probabley. Maybe someday I will get up enough energy to go figuring out what card goes for what challenges. Lol! Thanks for the list bye the way. I am gonna check it out today. Thanks again for this and I am gonna try it. I will get back to you on how it turns out. Take Care Sweetie. Hugs.
Hi Dorcas! thanks for stopping by my blog the other day and sorry because it took me so long to get back to you. Love this tutorial, thanks so much for sharing it! my question to you regarding my coloring was about the shading around the images, that is something I want to start doing because I see your images come alive when you add it! and I love that effect! but I don´t know how to do it :-( I try to follow what you do but I´m not completely happy with the result. I´ll try to follow this tut on paper myself and see how it turns out :-)
Thanks again!! hugs!
Excellent tutorial. Congrats on the Sentimental Sundays DT, looking forward to working with you.
that is one cute little dude! and thanks for a fabulous tutorial for colouring on kraft cardstock with pencils.
hugs, annie x
Great tutorial ! Thank you to explain your pencil drawing technic, it's great.
Hugs
Gorgeous! :)
Wow- I want to try this- love the visual tutorial. I love the image on Kraft!
Thank you for sharing you time and talents in creating this tutorial. Your cards are so beautiful - each and every one of them.
oh goodness gracious, now COOL is THAT??!! I absolutely LOVE your coloring tutorial--THANK YOU for sharing!! I sooo want to buy some Prisma colors now. May I ask what I need to buy to get all the colors you used or started out with? I'm sure they come in so many different sets. Thank you so much!! :)
thank you so much for the tutorial, Dorcas! i'll have to try those colors. =) so i should really start with the lightest, right? i am used to start with the darkest and go lighter.
You are so talented and this tutorial is just so helpful, thanks so much!!!
Post a Comment